
Applying for your PRC Board Exam is a big milestone—whether you’re a fresh graduate or a repeater working toward your professional license. But if it’s your first time using the PRC LERIS online system, the process can feel overwhelming and confusing.
Don’t worry—this complete guide will walk you through everything step by step. No missed requirements. No rejected applications. No wasted time.
✅ Before You Begin: Checklist of Requirements
Before you register online, make sure you already have these:
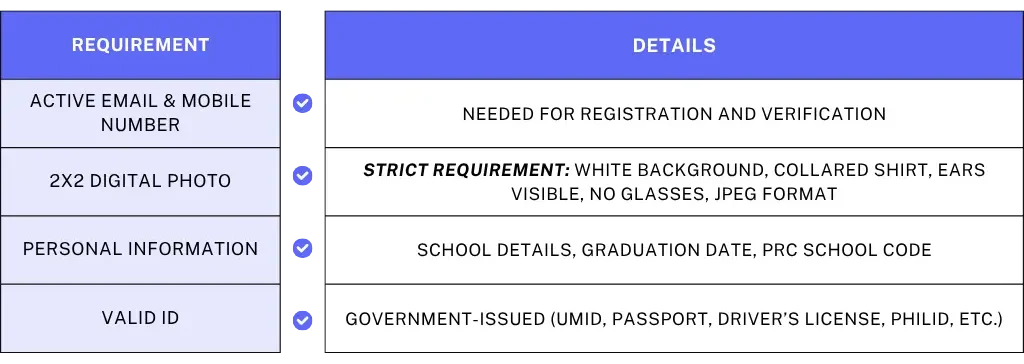
⚠️ Important: If your photo doesn’t meet PRC standards, your application can be denied.
🏁 Phase 1: Creating Your LERIS Account
Step 1: Visit the Official PRC Website
Go to 👉 https://online.prc.gov.ph/
Only use the official site to avoid scams.
Step 2: Click Register and Accept the Terms
Read the Terms of Service carefully—especially about:
- Forfeiture of exam fees
- False information penalties
Step 3: Fill Out the Registration Form
Enter your correct full name (must match your school records), birthday, and email.
✔️ Use your real details
✔️ Avoid typos—names with wrong spelling may cause delays
Step 4: Verify Your Email
PRC will send a verification link or OTP to your email. Click it to verify.
👤 Phase 2: Completing Your PRC LERIS Profile
Step 5: Fill Out Personal Info
After logging in, click Profile and fill in:
- Personal details
- Contact info
- Family background
- Education
- Employment (optional for fresh graduates)
Step 6: Upload Your Photo
🖼️ PRC Photo Rules:
- 2×2 size
- Plain white background
- Shirt with collar
- No smile, no filters, ears visible
- JPEG format
⚠️ Warning: Wrong photos will lead to rejection.
📝 Phase 3: Applying for Your Board Examination
Step 7: Click Select Transaction
Click the Examination tab.
Step 8: Input Your Exam Details
Select:
- Name of Exam (e.g., Nurse, Civil Engineer, Criminologist)
- Exam Type (First-Timer or Repeater)
- Testing Date and PRC Region
Step 9: Set an Appointment
Choose the nearest PRC Regional Office or Service Center.
📅 Available dates are usually marked in green.
Step 10: Select Payment Method
Choose from these PRC payment channels:
- LandBank ePayment
- GCash
- PayMaya
- UCPB
- PRC Cashier (pay onsite)
💡 Tip: Online payment is fastest.
💸 Phase 4: Finalizing Your Application
Step 11: Pay Your Exam Fee
- Save your Reference Number
- Screenshot your payment confirmation
Step 12: Print Your Forms
Go to Existing Transactions → Print:
- Application Form
- NOA (Notice of Admission) – available after document verification
🏛️ PRC Appointment Day – What to Bring
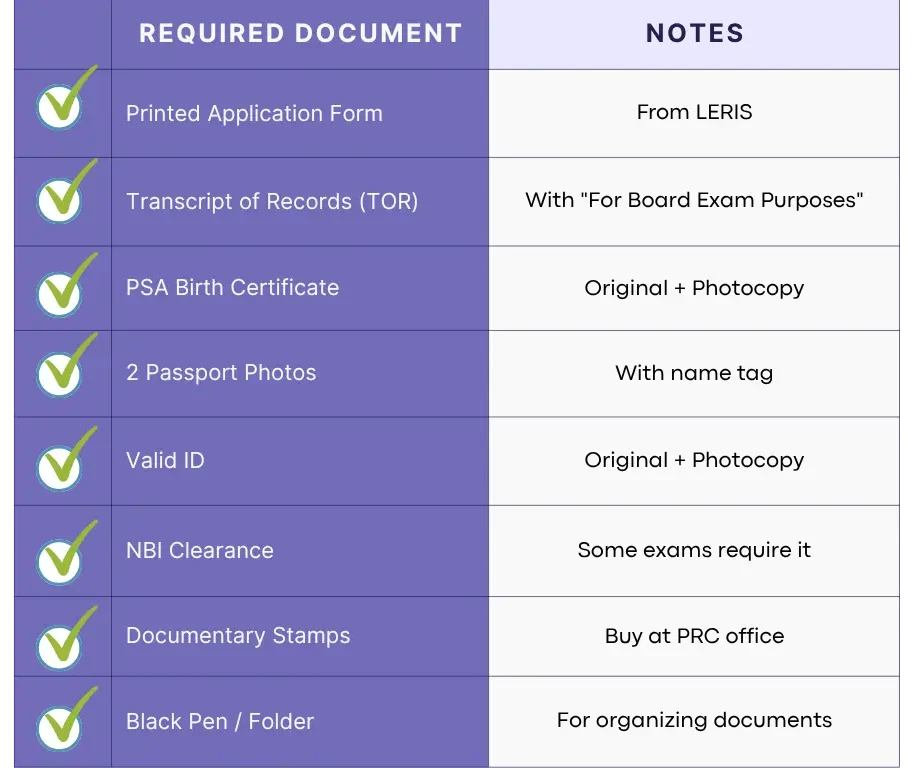
📌 Arrive before 6:30 AM—late applicants will not be admitted.
✅ Final Tips for a Smooth Application
✔️ Use a laptop or PC (LERIS is glitchy on phones)
✔️ Double-check your details before submitting
✔️ Always keep copies of your payment and forms
✔️ Follow PRC dress code: smart casual
🎓 Good Luck Future Professional!
You’re now ready to process your PRC Board Exam application like a pro. Stay organized, be early, and follow all instructions. Your professional journey starts here!
If you found this guide helpful, share it with your classmates and batchmates 💙
More PRC guides coming soon here at Examspinas!